
Element Options
Element parameters allow you to specify parameters for a specific template element (composition/sequence).
The parameters are contained in a separate element structure — custom_args; you can specify all the necessary parameters within it, simply separating them with commas.
These are optional and can be omitted if not required.
"Instagram Stories": {
    "preview": {
        "INST_3":   {"enabled": true, "name": "Instagram Stories 03", "options": false,
          "custom_args": {
            "comp_name": "Special",
            "layer_sets": "3D",
            ...
          }
        }
    }
}
"custom_args": {"comp_name": "Special", "layer_sets": "3D"}
Common Options
filetype
Allows you to change the format of the footage (images/videos) for selected item (if the global format of the footage is not suitable for all items).
Is part of the is_footage parameter, and cannot work without this group parameter.
To replace the image format, use:
JPG– group with images .jpgPNG– group with images .png
To replace the video format, use:
MOV– group with videos .movMP4– group with videos .mp4
"custom_args": {
    "filetype": "JPG"
}
"My Footages": {
    "preview": {
        "SIP_1": {"enabled": true, "name": "Custom Image", "options": false,
            "custom_args": {"filetype": "PNG"}
        },
        "SIP_2": {"enabled": true, "name": "Some Image", "options": false, "custom_args": {} }
    },
    "is_footage": "JPG"
}
After Effects only
parent_folder
Allows you to assign a name to the parent folder of a composition (within an After Effects template) in case there are duplicate names in different folders.
If template structures contain compositions with similar names from different templates when imported using the extension, a duplication error will occur.
To avoid this error and preserve similar names across different templates, use the option to treat the folder as the parent of a specific composition (template element).
"custom_args": {
    "parent_folder": "Stomp"
}
In the example below, due to the parent_folder, the name of the folder with Stomp templates will now be Insta Stomp.
"Stomp": {
    "preview": {
        "SMP_1": {"enabled": true, "name": "Stomp 1", "options": false,
            "custom_args": {"parent_folder": "Insta Stomp"}
        },
        "SMP_2": {"enabled": true, "name": "Stomp 2", "options": false,
            "custom_args": {"parent_folder": "Insta Stomp"}
        }
    }
}
comp_name
Allows you to give the composition a custom name (if you want a name different from the element name in the package structure).
"custom_args": {
    "comp_name": "Long name 1"
}
"Template": {
    "preview": {
        "SHR_1": {"enabled": true, "name": "Short 1", "options": false,
            "custom_args": {"comp_name": "Long name 1"}
        }
    }
}
layer_sets
Layer state settings for the applied composition (allows you to add motion blur, 3D, etc. to the layer).
| Value | Action |
|---|---|
3D | Apply 3D for the layer |
ADJUSTMENT | To make the layer adjusting (Adjustment Layer) |
COLLAPSE_TRANS | Add transformation features |
MO_BLUR | Add motion blur for the layer (Motion Blur) |
You can use one value or several values at once (or even all at once), just separate them with colons : (ex: ADJUSTMENT:3D) and write them in any order, but on one line.
"custom_args": {
    "layer_sets": "ADJUSTMENT:3D"
}
"Template": {
    "preview": {
        "SHR_1": {"enabled": true, "name": "Short 1", "options": false,
            "custom_args": {"layer_sets": "ADJUSTMENT:3D"}
        }
    }
}
layer_timing
Allows to assign a type of timing for the applied elements (to add a control marker In/Out, animation reverse, and so on).
To use this option you need to have a special layer with a comment ATOM_TIMING_CONTROL_LAYER and one marker on a particular time moment (with any title) inside the composition.
A certain point in time is defined by the position of the marker on the layer (usually, the markes should be placed in the ending point of the animation).
| Value | Action |
|---|---|
COPY_MARKERS | Copy markers (preserving their names and a point in time) from the timing control layer to the applied element. 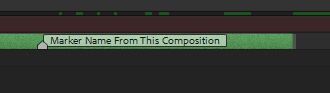 Condition: The control layer required |
TIME_REVERSE | Reverse time for the layer animation without markers and particular values (equivalent to Layer > Time > Reverse Layer). 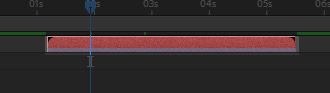 Condition: No conditions |
TIME_REMAP_ONLY | Add Time-Remapping without markers and particular values. 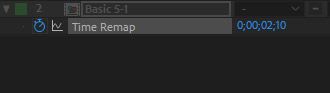 Condition: No conditions |
TIME_REMAP_LAYER_DURATION | Add Time-Remapping with special values for timing control (the longer the layer - the longer and slower the animation, and vice versa). 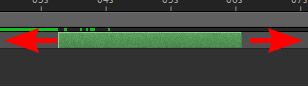 Condition: No conditions |
TIME_REMAP_IN_OUT | Add Time-Remapping and two markers (In & Out) with special value for the timing control (with proper animation of a shotdown). 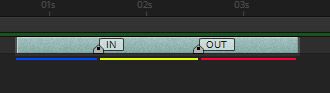 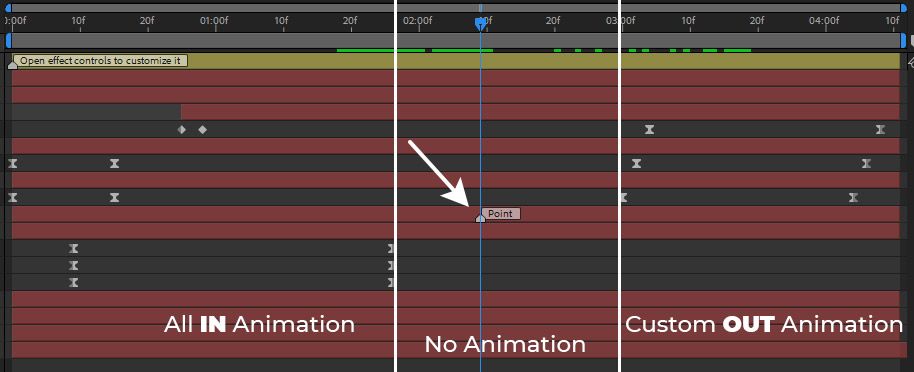 Suitable for: Scenes with their own animation for a shotdown; proceed with showing the shotdown animation after the marker. Special aspects: You can manage the length and speed of the composition's animation by moving the markers (moreover, make the layer longer or shorter). How to assign: Before application locate the marker (inside the composition on the timing control layer) on a piont of time needed; that point will be a moment of division of start and end of the animation (area between In & Out). Principle of operation: The animation goes from the layer beginning to the marker In (blue line), there's no animation between the markers In and Out (a yellow line is kind of an empty area where the animation is paused). After the marker Out the animation goes on till the layer end. Condition: The control layer needed |
TIME_REMAP_IN_OUT_REVERSE | Add Time-Remapping and two markers (In & Out) with special value for timing control (but with animationf of ending with the help of time backward winding). 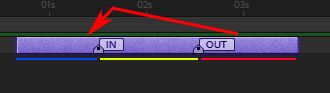 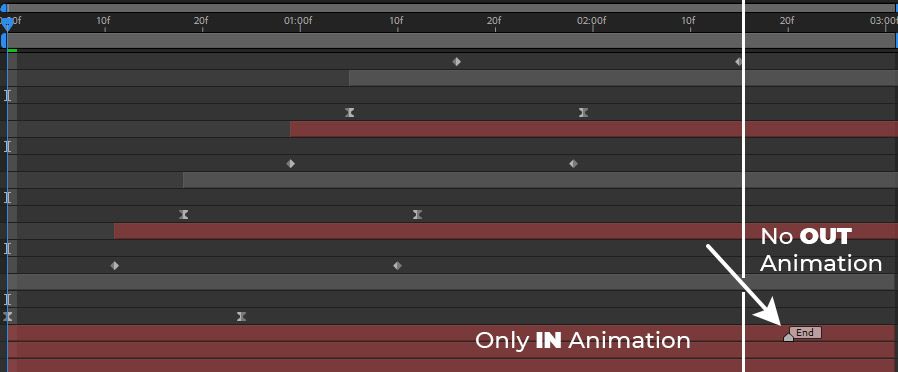 Fits to: Scenes without their own animation of ending; you need to create it showing the reverse of the current animation. Features: You can control the length and speed of the composition animation due to markers moving (and make the layer longer or shorter). How to apply: Before you use the parameter, place the marker (inside your composition on the timeline control layer) in the moment where the animation ends (after the last keys of the animation) - that point is used to reverse the animation after the marker Out (the reverse). Principle of operation: The animation goes from the layer beginning to the marker In (blue line), there's no animation between the markers In and Out (a yellow line is kind of an empty area where the animation is paused). After the marker Out the animation goes backwords, like from the marker In to the beginning of the layer (imitates the effect of animation ending, in fact it is a reversed animation of appearance). Condition: The control layer is needed |
TIME_REMAP_IN_CONTINUE | Add Time-Remapping and a marker In with the special value for timing control from the beginning of the layer before the marker (after the marker In the animation goes on and doesn't stop). 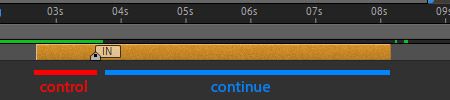 Suitable for: Scenes with elements that have to go on even after the control marker (flashing or other effects). Here you can control the animation before the marker In. Features: You can regulate speed and time of the animation by the marker In, however, the further animation is out of your control, from the end point of the marker In till the end of the layer. How to apply: Before using the marker mentioned, put marker (inside your composition on the timing control layer) into a moment of endimg your main reveil animation (before looped animation) - that point will be used for the reveal animation that goes till the end of the marker In. Principle of operation: The animation goes fron the beginning of the layer till the marker In, after that the animation goes from the moment where the marker In is placed and till the end of the layer. Condition: The control layer required |
"custom_args": {
    "layer_timing": "TIME_REMAP_IN_OUT_REVERSE"
}
"Template": {
    "preview": {
        "SHR_1": {"enabled": true, "name": "Short 1", "options": false,
            "custom_args": {"layer_timing": "TIME_REMAP_IN_OUT_REVERSE"}
        }
    }
}
Premiere Pro only
timing_offset_ticks
Allows you to set the offset when applying the sequence Premiere Pro (.prproj) to a timeline track.
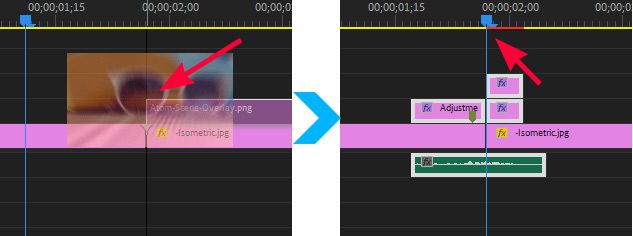
This option is very useful for applying transitions - because it allows you to apply a sequence by splitting it into two parts at the cursor position.
When you double-click on the element (if the option is disabled/enabled):
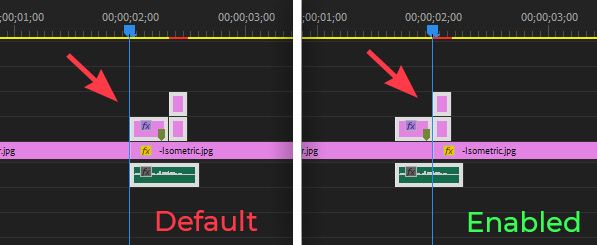
Thanks to the offset, our applied elements have shifted to the left and are positioned directly in the center of the cursor position, so we don't have to move the applied element every time.
If in your sequence (the source file for the application) if there are audio tracks, then for this option to work correctly, they must start from a single time point. This applies only to the starting point of time.
Process for getting values for a parameter
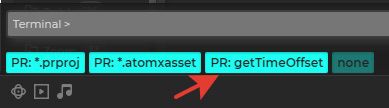
To do this, open Dev Panel:
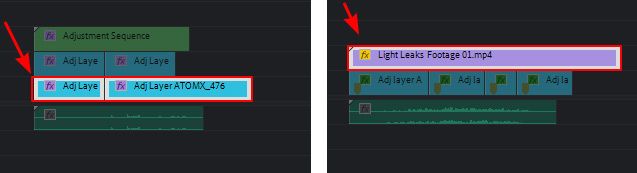
Next, select 1 layer inside the sequence (we need the layer on the left).
As mentioned earlier: if there is audio track(s), it should not be longer than our layer. It should start at the same time, or later.

Before deselect the layer, click the PR: getTimeOffset button in the Dev Panel.
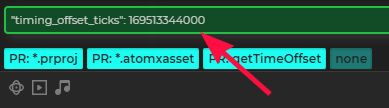
An option will appear in the terminal window with the value - this is a whole code to insert, but without the custom_argsconstruct. Copy the value from the terminal and paste it inside the custom_args construct for your element.
"custom_args": {
    "timing_offset_ticks": 84756672000
}
"Template": {
    "preview": {
        "SHR_1": {"enabled": true, "name": "Sequence 1", "options": false,
            "custom_args": {"timing_offset_ticks": 84756672000}
        }
    }
}
duration_ticks
If you use sequences Premiere Pro (.prproj) in its own package, this parameter is important for the correct application of elements to the timeline track.
This parameter checks duration of sequence.
Process for getting values for a parameter
To do this, open Dev Panel:
Next, select all the elements on the one video track (we need the video track with the longest length, regardless of the number of elements on it).
Without removing the selection from the layers, click the PR: getDuration button in DevPanel.

An option will appear in the terminal window with the value - this is a whole code to insert, but without the custom_argsconstruct. Copy the value from the terminal and paste it inside the custom_args construct for your element.

"custom_args": {
    "duration_ticks": 127135008000
}
"Template": {
    "preview": {
        "SHR_1": {"enabled": true, "name": "Sequence 1", "options": false,
            "custom_args": {"duration_ticks": 127135008000}
        }
    }
}
tracks_used
If you use sequences Premiere Pro (.prproj) in its own package, this parameter is important for the correct application of elements to the timeline track.
This parameter checks and reserves the required number of tracks for our elements, thus avoiding substitutions of other elements on the timeline.
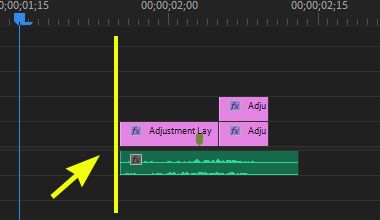
Specify the number of tracks occupied by elements in your sequence (for video and audio separately).
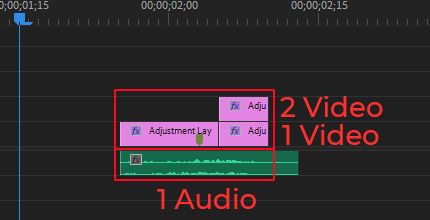
In the example above: clips on a sequence occupy 2 video tracks and 1 audio track.
- Only tracks filled with elements.
- Only the number of occupied tracks, not the elements themselves on them.
We should write it down like this: [number of video tracks, number of audio tracks]
In our example, this is: [2, 1]
"custom_args": {
    "tracks_used": [2, 1]
}
"Template": {
    "preview": {
        "SHR_1": {"enabled": true, "name": "Sequence 1", "options": false,
            "custom_args": {"tracks_used": [2, 1]}
        }
    }
}